 A few months ago I decided I wanted to make a scale mail
corset after seeing these inspiring images of Bones and Lilies’ scale mail bodice and some runway pieces from Mcqueen that suggest scale mail. While black and silver are a classic combination, I wanted something a bit
softer, more feminine and subdued.
A few months ago I decided I wanted to make a scale mail
corset after seeing these inspiring images of Bones and Lilies’ scale mail bodice and some runway pieces from Mcqueen that suggest scale mail. While black and silver are a classic combination, I wanted something a bit
softer, more feminine and subdued.

Stage 1: Making scale quads
After reading about Bones and Lillies’ experiences, I decided
to make 4-scale quads instead of an entire sheet of scale mail.
I ordered my supplies from The Ring Lord, large size scales
with split rings. Initially, I opted for
split rings because they are more durable than regular jump rings and require
virtually no repairs since the ring is so secure.
However, if you decide to embark on a project like this,
purchase the regular rings instead of split ones. While I eventually figured
out my own technique for assembly, it’s not very intuitive initially to
assemble these with split rings because
As of this writing I have about 70 or so scale quads; I’ll
need about 100 in total. My ever-cheerful fiancée has taken up the quest along
with me and learned how to do it so we can meet the deadline for this piece (early July).
Stage 2: Selecting Fabric and Choosing a Corset Pattern
After perusing a variety of scale mail corsets and
considering fabric choices, I opted for “poppyseed”-colored dupioni silk from
The Silk Baron.

In person, the fabric is a two-tone mix that vacillates between
silver, subdued purple and lilac. It pairs well with some of my other favorite
colors—silver, blue, black, etc—making for a nicely versatile base. While I
considered ordering a custom corset from another maker, I realized that would
cause finishing problems with the piece itself, since the many hand stitches
would show through the lining. Furthermore, many of the classic corset shapes
on the more affordable or moderate end tend to “squish” the bust, rather than
gently shape around it. Ultimately, despite
the investment of time involved, I decided making it myself would allow me to
control the quality, fit and shape in several crucial ways.
I’ve made a few corsets in the past, primarily using the
“welt-seam method.” I’ve worked with custom drafts, Ralph Pink Patterns and
Truly Victorian. For this corset, I wanted to try a new method and a new
pattern, since I was frustrated with the way the welt-seam method sometimes
caused dragging and wrinkling problems on curvy seams. For this reasons, I
decided to use coutil bone casings and the “sandwich method” to create a
2-layer corset. The floating lining, constructed according to Sidney Eileen’s tutorial will beautifully mask the interior hand-stitching of individual scales.
In order to save time on construction and drafting, I bought
the Express Corset-Making Course from Scarlett Stafford’s website and the Cupid Corset pattern. I spent an evening modifying the pattern to my measurements earlier this month. I didn't document this, however, Scarlett made it easy (see notes below).
Here is the pattern I settled on-as you can see, it has a nicely defined waistline and a well-shaped bust, avoiding many of the issues of the afore-mentioned "bust-squishing" corsets. The trade-off is that the cups require a fair amount of precision, but this seems like a good trade for a lovely shape.

Regarding the Express Corset-Making Course: although some of
the more advanced makers on some of the sewing groups I follow said the course
was nothing special, since I am a visual learner, it has helped me tremendously
so far. Seeing the techniques clearly and up close as well as reading about
them helped me construct a mock-up of a much higher quality than I usually
would be able to produce. Furthermore, Stafford’s break-down of the math
involved in resizing measurements was profoundly clear, to the extent that my
coutil mock-up may be a near perfect fit on the first try!
Stage 3: Constructing the Coutil Mock-Up of the “Cupid”
corset
In order to document my process and determine what does and
doesn’t work, I decided to create my mock-up as a proper corset, rather than a
muslin-boned piece with many shortcuts.
Since the entire front of the corset will be covered in
scales, I modified the pattern to be closed in the front.
Supplies:
After a bit of trial and error, I determined that Tex-40
thread (sourced from SIL thread in NYC) was strong enough for multiple coutil
layers. I’ve been using Organ 90 size needles on my industrial machine and
changing them periodically throughout the project, since the tight weave of the
coutil seems to “eat” at them a bit. I did try Organ 100s but they seemed
unnecessarily damaging to the material.
Construction of the
Mock-Up:
I marked out the pattern on the coutil using wax tracing
paper and a wheel purchased in the NYC garment district. Although this is
standard use in any fashion design college class, it always baffled me why this
wasn’t ever mentioned in home sewing manuals, considering the pre-teen years I
spent gently scratching at patterns in frustration when a dart arose. One online source is here.
Materials used:
- Fabric is a tan coutil that was a birthday gift
- ½” boning channels I had leftover from a previous project from Steinlauf & Stoller
- Tex-40 poly-cotton thread instead of my usual Tex-21 (please excuse the offensive mismatch of colors, I wanted high-contrast for stitching practice). For the final creation I will probably spring for strong all-cotton thread, since the corset will be mostly natural fibers (coutil/silk).
I decided to sew on the boning channels before assembling
the body, because it made more sense to me. This worked out well.
Here is the CF and the cups pinned and ready. Stafford
suggested pinning in this way although I learned at FIT to generally pin in the
direction you’re sewing…however, this way was more sensible for pieces that might
shift vertically.
 |
While I considered basting the channels on for the mock-up
it seemed a bit tedious for this stage, so I opted for careful and potentially
excessive pinning instead. I will probably baste the more persnickety boning
channels (ie, “free-standing” and not on a seam) for the final garment.

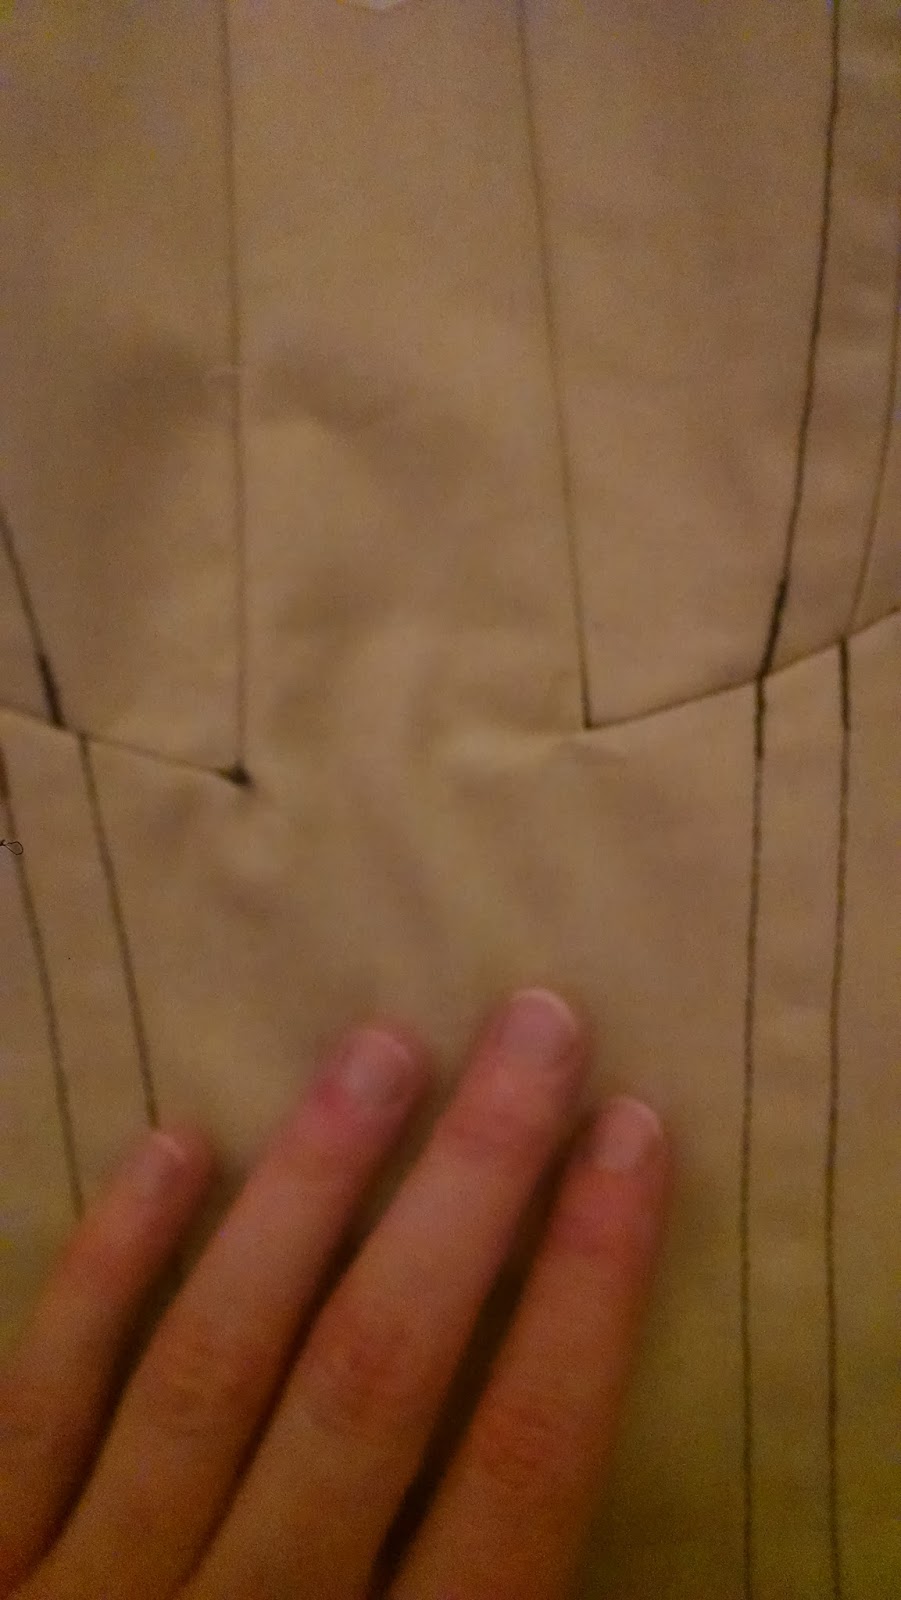
 Pictured here is the center front of the pattern. The “V’s” are for the bust
cups. I sewed around the corners (slightly in, perhaps 1 mm) so that I’d have a
guideline for stitching the cups in that was clear.
Pictured here is the center front of the pattern. The “V’s” are for the bust
cups. I sewed around the corners (slightly in, perhaps 1 mm) so that I’d have a
guideline for stitching the cups in that was clear. Here is one of the corset cups. I decided to grade one of
the seams since it might prevent a smooth top-stitching line and reduce overall
bulk. I rejected the notion of clipping the seam into corners because that has
created pressing issues with coutil for me in the past (impressions).
Here is one of the corset cups. I decided to grade one of
the seams since it might prevent a smooth top-stitching line and reduce overall
bulk. I rejected the notion of clipping the seam into corners because that has
created pressing issues with coutil for me in the past (impressions).
In terms of order of construction, I opted to construct the
entire “based” before inserting the cups, even though the cup pattern somewhat
aligns with the front 2 panels. This worked out well.
 Here are two attempts at the “pivot” where great accuracy is
required; the second on the right was sewn in one complete pass. Pre-stitching
the lower cup area helped increase my accuracy a lot. Obviously the second
attempt is far better because I was more aggressive with my clipping at the
corners. Professor King (a former teacher of mine) is perpetually right, you can see the result on the
right is superior because it can really lay flat.
Here are two attempts at the “pivot” where great accuracy is
required; the second on the right was sewn in one complete pass. Pre-stitching
the lower cup area helped increase my accuracy a lot. Obviously the second
attempt is far better because I was more aggressive with my clipping at the
corners. Professor King (a former teacher of mine) is perpetually right, you can see the result on the
right is superior because it can really lay flat.
Here is where I stopped for the day. I am very pleased with
the shaping of the bust panels and it looks like it will probably fit well with
few (if any) modifications). The boning channels weren’t perfect on the
left-hand side, though, so I may apply the bone casing for that section only
AFTER assembling the entire cup to ensure perfect symmetry.
So far I’m enormously pleased with the pattern. The next
step is to finish the last few panels and figure out if a length adjustment is
required so I can order flat steels. For lacing, I found a wonderful ribbon
supplier in the garment district with an enormous array of beautiful double-sided satin ribbons, which
will avoid the expense of ordering MORE supplies online.
To be continued!
No comments:
Post a Comment